Laws of Motion and Gravity
Understanding what to do with the laws of motion and gravity and how to make them work to the advantage of the pianist is what achieves pianistic success. Motion involves the relationship of the finger, to the hand and to the arm, for the movement of any one of these will involve the movement of others.
This concept is not a new one, yet the way to achieve this had not been implemented in a way that would help the pianist play in a coordinated way.
Gravity plays a pivotal role in piano playing by assisting in the control and fluidity of motion, which contributes significantly to pianistic success. When a pianist plays, gravity naturally pulls the arm, hand, and fingers downward, which can be harnessed to facilitate a relaxed and efficient playing technique. This downward force aids in the natural descent of the fingers onto the keys, allowing for a more nuanced control over dynamics and tone. Instead of solely relying on muscular force, which can lead to tension and fatigue, a pianist can use gravity to augment the weight of the arm, directing it through the hand and fingers. This approach not only conserves energy but also promotes a smoother, more coordinated motion where the movement of one part (finger, hand, arm) naturally influences the others. By understanding and employing gravity, pianists can achieve a seamless transfer of energy from the body to the keys, enhancing both the ease of playing and the musical expression.
Gravity plays a pivotal role in piano playing by assisting in the control and fluidity of motion, which contributes significantly to pianistic success. When a pianist plays, gravity naturally pulls the arm, hand, and fingers downward, which can be harnessed to facilitate a relaxed and efficient playing technique. This downward force aids in the natural descent of the fingers onto the keys, allowing for a more nuanced control over dynamics and tone. Instead of solely relying on muscular force, which can lead to tension and fatigue, a pianist can use gravity to augment the weight of the arm, directing it through the hand and fingers. This approach not only conserves energy but also promotes a smoother, more coordinated motion where the movement of one part (finger, hand, arm) naturally influences the others. By understanding and employing gravity, pianists can achieve a seamless transfer of energy from the body to the keys, enhancing both the ease of playing and the musical expression.
Three Basic Motions of the Finger
The finger has three basic motions;
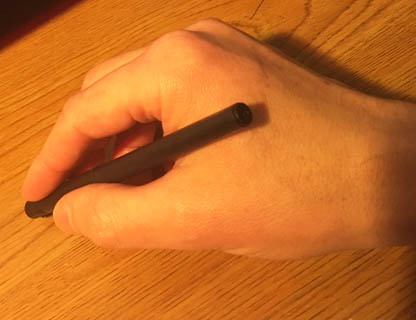
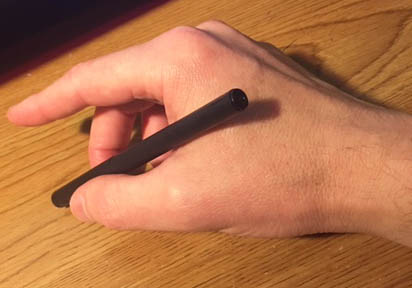
The tapping finger is the best method for setting the key in motion. The finger drops from its fulcrum at the hand knuckle (first phalanx and metacarpal bone) in a natural curve. To ascertain the correct movement, hold a pen or pencil in the right hand as if to write with it, then tap finger 2 (the index finger) up and down against the pencil. See Figure 1.3 a) and figure 1.3 b) below. By holding the finger as described above, you have achieved the correct way for the finger to execute its up and down motion.
Fingers 2, 3, 4 and 5 play in exactly the same way, while the thumb plays at a right angle from the hand, unbent from the hand knuckle, on its almost top edge.
- The thrust, or greatly curved position, is assumed when the finger is raised prior to tone production. The finger unbends slightly in descending towards the key but the nail joint remains vertical throughout. This method of playing is most destructive to a free technique because it elicits a dual muscular pull between the flexors and extensors.
- The clinging finger, also termed the flat finger, limits exertion to the extensor. It plays in a far less curved position, almost entirely unbent. The key is moved with but little change from this position. The clinging action of the finger tends to drag the elbow toward the keyboard, but this tendency must be counterbalanced by allowing a sufficient lapse to intervene in the supporting muscles of the upperarm. This in turn tends to drag the elbow away from the keyboard again to balance the pull of the finger. The clinging finger will create a tight wrist, and lead to tension throughout the entire system.
- The third form of motion known as the tapping finger is described below represents the correct movement.
The tapping finger is the best method for setting the key in motion. The finger drops from its fulcrum at the hand knuckle (first phalanx and metacarpal bone) in a natural curve. To ascertain the correct movement, hold a pen or pencil in the right hand as if to write with it, then tap finger 2 (the index finger) up and down against the pencil. See Figure 1.3 a) and figure 1.3 b) below. By holding the finger as described above, you have achieved the correct way for the finger to execute its up and down motion.
Fingers 2, 3, 4 and 5 play in exactly the same way, while the thumb plays at a right angle from the hand, unbent from the hand knuckle, on its almost top edge.

